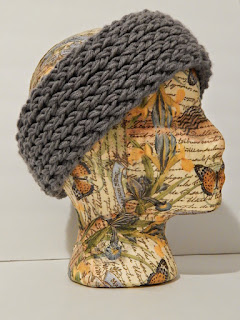
This pattern uses three strands of worsted weight held together as one using a technique found in this video. This technique is especially great for when you found the perfect color for your project but the yarn is worsted instead of bulky!
The headband made with this pattern is slightly tapered at the ends, but you can certainly chose to make it all one width throughout the project.
For this project, you will need:
- 120 yards of worsted weight yarn (Sample uses I Love This Yarn in "Grey Beard")
- Don't forget to use three strands as one!
- You could definitely try this pattern with bulky yarn or two strands of worsted weight held together, but this may change your total row count.
- a long loom with a gauge of 11/16" and at least 14 peg pairs (7 on each side)
- your favorite loom hook, preferably one that can handle a lot of work (some sections can get very tight when knitting over)
- a crochet hook to remove the item from the loom and weave in ends
- a tapestry or yarn needle to sew the ends of the headband together
Let's get started!
Step 1: Figure-8 cast on (like in this video) 10 total pegs (5 on each side).
Step 2: Knit using the figure-8 stitch for 4 rows.
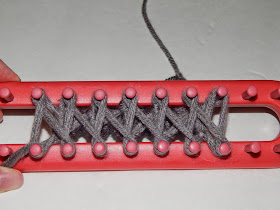
- When working in the figure-8 stitch, be sure that the stitches on the middle pegs looks like an X like shown:
- If at any point your stitches do not look like this, you may be in danger of flipping the reversible stitch.
- When knitting over, start at the peg on the opposite side of your working yarn and on the far end of the loom. Then work back and forth between the front and back of the loom, ending on the peg you wrapped last.
Step 3: Increase to 14 total pegs (7 on each side).
- Starting on the pegs on the opposite side of the working yarn and with the help of your loom hook, grab a loop you have just knit off.
- With the help of your loom hook, put the twisted loop on the nearest empty peg.
- Repeat with the peg on the other side of the loom. You will have to tug the loop quite a bit to get it to stretch where you want it to go.
 |
| This is how the first side should look after increasing. |
- Repeat on the side of the loom with the working yarn (I recommend doing the working yarn peg last).
 |
| This is how the second side should look after increasing. |
This was a very long explanation, and you are welcome to use another increase method if you prefer. After much trial and error, I settled on this method because others I had tried seemed to make one side of the headband looser than the other side.
Step 4: Breathe! The increasing is the hardest part, promise.
Step 5: Continue to knit in the figure-8 stitch for 50 rows.
Step 6: Decrease back to 10 pegs (5 on each side).
- Simply take the loops on the outer pegs, and place them on the nearest pegs.
Step 7: Wrap the loom with the figure-8 stitch as you would normally.
- The outer pegs will have three sets of loops on them. Knit the bottom two sets over the top set.
- It may be easier to knit the bottom loop over the top two, and then the bottom loop over the final loop. Just make sure you get all the old loops over and keep the new loops in place.
Step 8: Continue to knit in the figure-8 stitch for 4 rows.
Step 9: Bind off, as shown in this video here. You will only be doing the bind off in the beginning of this video; you can ignore the section about the anchor yarn.
Here is what the project looks like now that it's off the loom:
Step 10: Taking your tapestry or yarn needle and some scrap yarn, sew the ends of your project together using the method of your choice. I usually just play around with the item until it looks right to me.
Step 11: Using your crochet hook, weave in your ends. Be sure to weave them in the middle of the project and not the back side as the project is designed to be reversible. If you don't want the headband to be reversible, you can weave in the ends however you please.
Your headband is now complete!
The headband measures 2.25-3 inches wide with a circumference of 21 inches and will likely fit most teens and adults. To make it shorter or longer, just alter the amount of rows in Step 5.
As always, feel free to experiment with your own project. You are more than welcome to leave a comment with a photo of your finished headband.
Please don't hesitate to ask any questions you have.
Thanks for reading, and have a fabulous day!


